Always wanted to reuse old hard disks as the cases are made of high quality aluminum. Here are parts from different hard disks. These parts will form the top and bottom of the Arduino controller case. Once you get a hold of the right screwdrivers, it is a breeze to dismantle a hard drive (It is actually faster and more fun than reformatting a hard drive if you want to securely dispose of it)

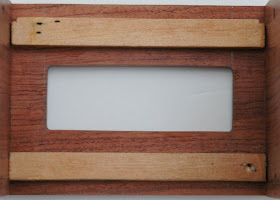
The first step is to cut the front piece. After measuring the text area of the LCD, I cut the opening with a hand saw (and a lot of sanding to get is straight). Then in order to align and mount the LCD I glued two strips of wood with the LCD in place. (Although the picture below shows the sides already glued, you do this step without the sides in place)

Next I cut the sides and glue them to the front piece. In order to facilitate positioning and gluing, I first mounted the top and bottom aluminum pieces to the sides and then with the box already formed, I glued it to the front piece. I also put some weight on top of the box to allow better gluing. Used regular wood glue.

The front and sides glued together.

Next, I mounted the "shield" to the case. In this configuration, the shield is fixed and the Arduino (Freeduino) is removable. All the connections are to the shield, including DC power. I can easily remove the Arduino board for programming and leave the controller attached to the stereo system. The small green board at the forefront is the 3.3V I2C level shifter. The DAC connects to the Arduino controller through these 5 pins. Center pin is GND as GND has to be shared between controller and device.

Below, you can see the Freeduino board mounted on top of the "shield". As the Freeduini is a kit, I soldered the headers on the bottom of the board.

Here you can see detailed connections to the different parts.


Amazing!
ReplyDeleteDat Sum Brazilian Cherry?
ReplyDeleteThe wood is "Bubinga" or "African Rosewood" http://hifiduino.blogspot.com/2009/05/coming-along.html
ReplyDeleteHow much did the LCD display cost?
ReplyDeleteI bought the LCD from here: http://www.web4robot.com/SerialLCD.html
ReplyDeleteI costs more because it has a serial interface, making programming and interfacing easier to do. You can save $10 if you interface to the native interface.
Your blog is outrageous! I mean, Ive never been so entertained by anything in my life! Your vids are perfect for this. I mean, how did you manage to find something that matches your style of writing so well? Im really happy I started reading this today. Youve got a follower in me for sure!
ReplyDeleteThank you for this awesome tutorial!
ReplyDeleteDoes it really work?
ReplyDeleteGreat website, continue the Excellent work!
ReplyDelete